Transaction Browser Options
The Transaction Browser Options screen is designed to help you filter the kind of transactions to either display on the
Browse Transactions screen, or print on a
Transaction Journal.
The Transaction Browser Options screen is accessed from either:
Browse Transactions
- Click Transactionsin the Button Bar at the top of the screen
- Then, click the Browse button.
- Click the Change Year, Filter & Sort button on the Browse Transactions screen:
OR
Transaction Journal Report
- Click the Reports menu in the Button Bar at the top of the screen
- Then, click the Transaction button.
- Click the Transaction Journal button.
Choose any of the following tabs to apply additional settings:
![]()
 Filter tab
Selecting Transaction Journal will bring up the interface with selections to choose from:
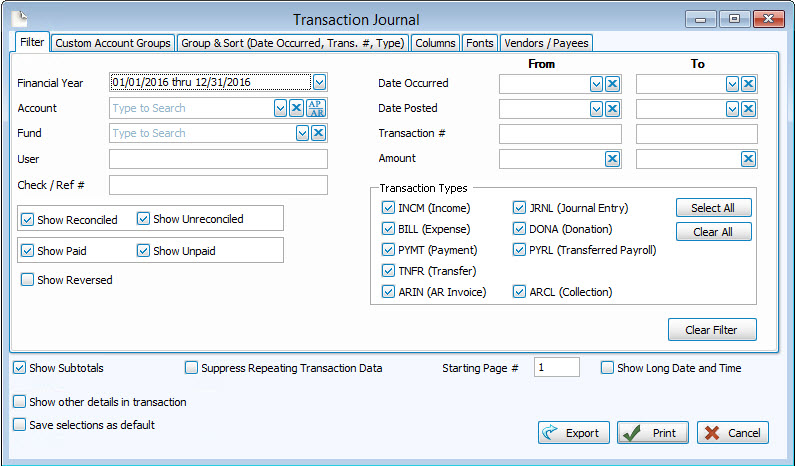
Specify the common characteristics that you want the transactions in the list to have by choosing any or all of the following Filter tab options. To restore the settings to their original state, click the Clear Filter button at any time on the bottom right.
- Financial Year:
Select an Accounting Year. When clicked, the box will show you a list Accounting Years and the following indications:- Beg Bal Finalized:
Indicates that the Accounting Year Beginning Balances have been finalized with a checkmark.
 - Closed:
Indicates that the Close Accounting Year procedure has been completed.
- Beg Bal Finalized:
- Account:
The account name and accompanying ID. - Fund:
Choosing a fund will prepare the transaction list to show only accounts that have been linked to the Fund selected. - User:
Type the name of one of your Users to view only their entered transactions. - Check / Ref #:
The specific check or reference number. - Show Reconciled / Show Unreconciled:
Click to place a checkmark next to the box indicating whether you wish to show one or the other or both. Reconciled items consist of transactions that have been cleared by a previous finalized
Bank Reconciliation. - Show Paid / Show Unpaid:
Filter for transactions that represent bills that have been paid by placing a check in the box. To show bills that have not been paid, place a check in the . - Show Reversed:
Click to place a checkmark in the box to also show reversal transactions associated with the filter you apply. Otherwise, reversed donations will not show. - Date Occurred:
The date on which the actual donation took place. - Date Posted:
The date on which the donation was entered into the system. - Transaction #:
The number given by the software when the donation is entered. - Amount #:
The dollar amount recorded with the donation. - Transaction Types:
Click Select All to fully broaden the scope of you wish the list to contain. You can also click Clear All and place a checkmark next to each individual desired Transaction Type.
Note:
When clicking the Show Unpaid box, be sure to place a check only in the BILL (Expense) under Transaction Types to show only unpaid bills. Otherwise, any other types of transactions marked the same way will also show in the list.
Note:
Enter From and To ranges of a date, number, or amount specific to what you want in your transactions. For any of these items, enter the same date, number, or amount in both From and To boxes to specify that you want transactions of only one Date Occurred, Date Posted, Transaction #, and/or Amount.
Apply further settings to the transactions list by making your selections any or all of the other tabs. When finished, click the Print or OK button.
Custom Account Groups tab
You can customize the report to show only the accounts and/or funds associated with specific Custom Account Groups.
- Choose any or all desired Custom Account Groups, you can select whatever desired custom account groups individually.
- Click Select All to place a check next to all options.
- Click Clear All to remove all check marks.
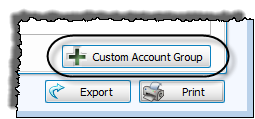
- Or click the + Custom Account Group button to create a new set of accounts.
Group & Sort tab
Use the Group & Sort tab to sort and group the list of transactions by up to three columns (sort fields). Click to change the order of each sort field to either Ascending or Descending order:
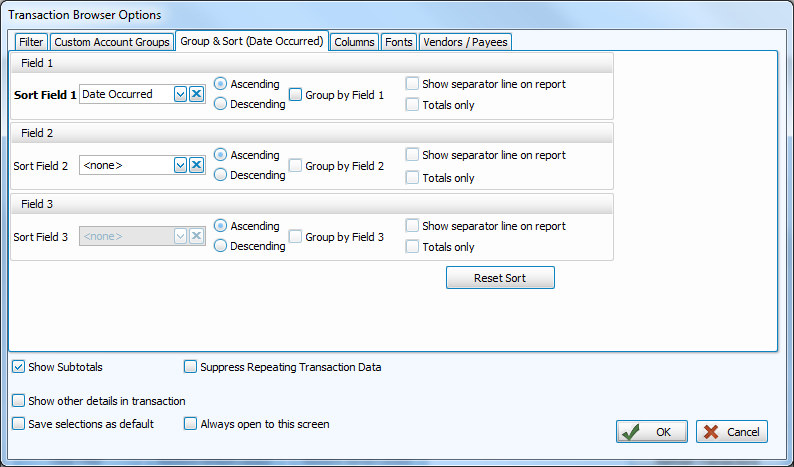
- Place a checkmark next to Group by Field (1, 2, or 3) if you will be grouping together by the chosen sort field.
- If you will be printing a
Transaction Journal, you have the following additional options:
- Show separator line on report
For each sort field you have chosen to group. Placing a check in the box will place a horizontal line to separate contents of the report by that field. - Totals Only
Place a checkmark in the box to show only the totals of the sort field you have chosen to group by.
- Show separator line on report
If needed, click Reset Sort to return the selections to their original, default state.
Columns tab
The Column Selector or Columns Tab allows you to decide which fields from The Individual Record or The Family Record will be visible on the report and which will not be visible.
On the left hand side Available Columns are the columns that are not showing but are available to be shown if desired. On the right side Visible Columns are the columns that are currently selected to be shown:
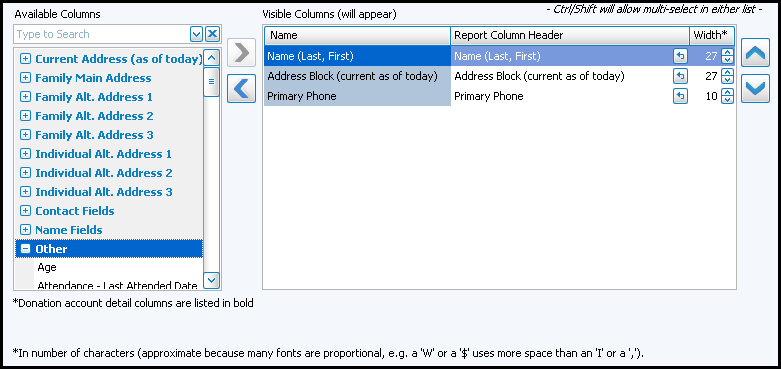
- If needed, to browse the Available Columns, click the
 to expand a group of fields or use the "Type to Search" dropdown
  box to choose a column.
 - You can either highlight the column and use the
 left and
  right arrow buttons to bring it back and forth, or double click on it to move it to the opposite side of the screen.
 - Use the
 up and down arrow buttons to rearrange the order of the columns.
 - Underneath the Visible Columns on the right is a space for the "Report Column Header". You can edit this text to label that field differently on your printed / exported report without changing the actual column name in the database.
For example, you could remove "(current as of today)" from the Address field's Report Column Header, as it would likely be unnecessary to include on the report.
- Each column is set to print at a certain column width automatically. You can also change the width of the columns that show on the report. Raise or lower the number in the Width* column according to your preference.
- Click OK when you are satisfied with your column selections.
- You can click on the 'Select Fields' button to the right of the report name dropdown list to reopen the Column Selector and make additional changes later.
Fonts tab
If you are printing a Transaction Journal, click to change the Page Header, Column Headings, and the Body Text to the typeface Fonts tab, styles, and sizes you wish to use.
Vendors / Payees tab
If you want your list to contain only transactions that affect certain vendors / payees , select them from the Available Vendors / Payees box and they will appear in the Include only listed Vendors / Payees list. Click an option you wish to remove and click Remove Selected as needed, or click Clear All Selections to clear the list.
Additional Options tab
Place a checkmark next to any of the boxes to perform the following functions. Some options are available only on a
Transaction Journal while other are only available in
Browse Transactions.
- Show Subtotals (Only on Transaction Journal):
Shows a subtotal line after every set of credit and debit amounts associated with the transaction. - Suppress Repeating Transaction Data (Only on Transaction Journal):
Shows one instance of information per transaction on the Transaction Journal that would otherwise be repeated on each line item per transaction. - Show other details in transaction:
On the Transaction Journal, marking this option shows a line for each detail that affects the transaction. Each line will show in italicized font the account number, the account name, the amount, and whether it was a debit (DR) or a credit (CR). If choosing this on the Transaction Browser Options screen, pressing the OK button will show a Add button next to each transaction number in the Browse Transactions list. Click the button to expand the transaction details.
 - Save selections as default:
Checking this box and pressing the Print or OK buttons will automatically make the same selections the next time you enter this screen. - Always open this screen (Only in Browse Transactions):
Makes sure that the Transaction Browser Options screen hovers over the Browse Transactions screen when you access it. - Starting Page (Only on Transaction Journal):
Changes the number of the first page of the Transaction Journal to the number placed in this field. - Show Long Date and Time (Only on Transaction Journal):
The report shows the time along with the date when marked with a check. Otherwise, the report shows only the date. Regardless, the date is always shown in full (long) format.
The resulting transactions list shown will reflect the accumulation of all the selections made on the Filter, Custom Accounts, and Vendor / Payee tabs. Items selected on the Group & Sort and Columns tabs affect the structure and layout of the list. If you are printing a Transaction Journal, the Fonts tab selections will determine the typeface used on the report.
